In this exercise, you upgrade your application programming interface (API) and application to use Amazon Cognito user pools for authentication. You create the user pool, update the REST API to require authentication, and then deploy an updated version of the application that sends the user to a sign-in page.
Task 1: Setting up an Amazon Cognito user pool
In this task, you will create the Amazon Cognito user pool. Users will come to your application, and then be redirected to Amazon Cognito hosted pages for signing in or signing up. Amazon Cognito will need to know the location of your application to redirect users back to it.
In the console, open the Amazon Cognito dashboard by searching for and choosing Cognito.
Make sure that you are still in the N. Virginia Region (us-east-1).
At the top-right corner, choose Create a user pool.
Under Cognito user pool sign-in options. Select User name, Email and Phone number.
Choose Next.
On the MFA and verifications page, choose No MFA. Choose Next.
Choose Next.
On the Configure message delivery select Send email with Cognito.
Under SMS leave Create a new IAM role selected and paste dragons-sms-role for IAM role name.
Choose Next.
For User pool name paste in dragons-pool.
Under Hosted authentication pages select Use the Cognito Hosted UI.
Under Domain enter in a domain name and Cognito will test the availability.
Copy down the Domain. It should should similar to: https://.auth.us-east-1.amazoncognito.com
Under Initial app client leave Public client selected.
For App client name, enter a client name. For example, dragons-webclient.
Under Allowed callback URLs enter the URL to the index.html page of your Dragons application
As an example, the Callback URL(s) will look similar to this URL: https://<MY-BUCKET>.s3.amazonaws.com/dragonsapp/index.html. Replace <MY-BUCKET> with the unique bucket name that you created previously.
Expand Advanced app client settings. Under Authentication flows choose ALLOW_USER_PASSWORD_AUTH.
Under OAuth 2.0 grant types choose implicit grant.
Choose Next. Choose Create user pool.
Choose User pools and choose dragons-pool. Choose the App integration tab.
Make note of the Client ID at the bottom.
Task 2: Configuring Amazon API Gateway for authentication
In this task, you will update your REST API to require authorization from the Amazon Cognito user pool that you created. After you deploy this change, unauthenticated users will no longer be able to call the REST API methods.
In the console, open the Amazon API Gateway dashboard by searching for and choosing API Gateway.
Choose your DragonsApp API.
In the API navigation pane, under API: DragonsApp, choose Authorizers.
Choose Create New Authorizer and configure the following settings.
Name: cognito-authorizer
Type: Cognito
Cognito User Pool: dragons-pool
Token Source: authorization
Choose Create.
Now that you created an authorizer, you can configure your GET and POST methods to require authorization.
In the API navigation pane, under API: DragonsApp, choose Resources.
In the Resources navigation pane, choose the GET method of the /dragons resource.
Choose Method Request.
In Settings, next to Authorization, choose the pencil (edit) icon and select cognito-authorizer.
Note: If you do not see cognito-authorizer in the list, refresh your browser.
Save the new setting by choosing the check (update) icon.
Repeat these steps for the POST method of the /dragons resource.
Task 3: Deploying the API
You must deploy a change to your resource configuration to update your prod stage.
Select Actions > Deploy API.
For Deployment stage, select prod.
Choose Deploy.
Task 4: Updating and testing the web application
In this task, you will deploy an updated edition of the web application that uses the sign-in user interface (UI) from Amazon Cognito.
The updated web application is available at RELATIVEdownloads/webapp3.zipRELATIVE. You might want to attempt the deployment yourself before you follow the step-by-step instructions.
Return to the application that you deployed in the previous exercise.
The version 2 application that is currently deployed should now fail because your API requires authentication. In the application, test both the GET /dragons and POST /dragons buttons.
Using both buttons should display a Network Error message.
In the AWS Cloud9 or local IDE terminal, download and extract the web application.
Run the following AWS Command Line Interface (AWS CLI) command and paste the URL output in a web browser. This will open the web application, which is hosted on Amazon S3.
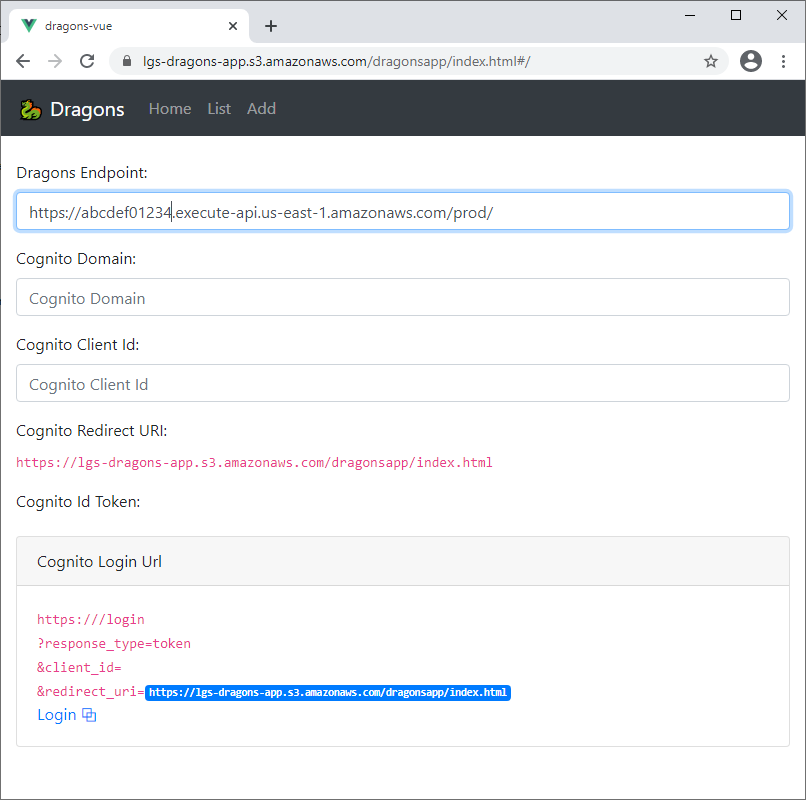
The Dragons Endpoint web application should be saved from the previous exercise. If not, you can construct the endpoint from the URL that you previously saved in a file. To do so, delete the dragons resource from the end of the URL. For example, https://abcde01234.execute-api.us-east-1.amazonaws.com/prod/dragons becomes https://abcde01234.execute-api.us-east-1.amazonaws.com/prod/.
Dragons Endpoint application interface
Configure the web application’s Cognito Domain by using the Amazon Cognito domain that you noted previously. The domain will look similar to this example: <some-unique-name>.auth.us-east-1.amazoncognito.com
Configure the Cognito Client Id for the web application with the Amazon Cognito client ID that you noted previously.
Observe that the Amazon Cognito settings are used to build a login URL that will send the user to an Amazon Cognito hosted sign-in page.
In the web application, choose Login.
Enter your email and create a password. Then choose Sign up.
This action will take you through the email verification process and create an entry in the Amazon Cognito user pool directory.
After you are redirected back to the web application, observe that the application has now saved a token from Amazon Cognito.
In the List and Add application pages, test both the GET /dragons and POST /dragons buttons. They should now send an authorization header to API Gateway to authenticate requests.